How to Import Word Documents and Text into PageMaker 7.0 Using the Place Command

How to Import a Text File Using the “Place” Command
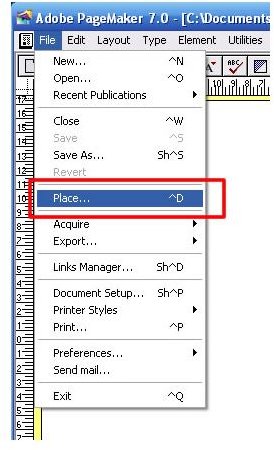
- Open the File menu, and then select Place… from the drop-down menu. This opens the Place dialog box.
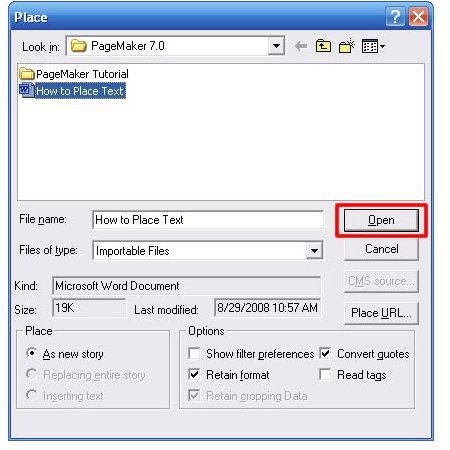
- Scroll to the folder that your text file is in and double click to open it. Locate and double click on the file that you want to place.
- Click on the Open button. Your cursor will change to a loaded text icon. Position your cursor at the spot on your document where you want to import the text file.
- Click on the spot on the document where you want to import your desired text. Your text will flow downwards to import as much of the text as will fit into your column, text block or page.
- Edit and format your text as needed.
Quick Tip
You can import your text or graphic directly into a new text box. When the cursor changes to a loaded icon in Step #3, click and drag the mouse in a downward, diagonal direction. This will create a text box. Once you release the mouse, your imported file will be placed into this text box.

Importing Large Amounts of Text

If you have a large amount of text from Microsof Word or another source, it may not fit into the column or page that you place it in. When the amount of text you place overruns your column or page, a red, downward-pointing arrow will appear on the bottom handle of your text block, unless you select Autoflow.
Flowing Text in Your Document
There are two methods you can use to place an external text file into a PageMaker document:
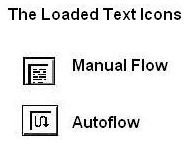
- Manual Flow - Lets you manually place the remaining text into another column or page
- Autoflow - Lets your text flow automatically into the next column or successive pages.
Manual Flow
- Click on the red arrow to continue placing text. The cursor will change back to a loaded text icon.
- Position the loaded text icon at another spot on your document, and click. Once again, the text will flow to the bottom of the column, text block or page.
- Repeat this step until you have placed all your text. When all the text has been placed, the bottom handle will be empty.
Autoflow

- Open the Layout menu from the menu bar.
- Select the Autoflow command from the drop-down menu. The loaded text icon will change to have a curved arrow rather than little horizontal lines.
- Click on a spot on the document to place your text. The text will be placed automatically, flowing from one column or page to the next. PageMaker will add more pages as needed.
Avoid Text Formatting Before Importing
If you intend to place a text file into a PageMaker document, it is generally best to use as little or no formatting. Microsoft Word contains a ton of formatting so it’s best to copy the text into Notepad or Wordpad before importing it. Once you have imported the text into your document, you can then format, edit and otherwise manipulate the text in PageMaker.
This post is part of the series: PageMaker 7.0 Basics
This series of Adobe PageMaker tutorials provides step-by-step instructions on using PageMaker to create professional, high-quality publications such as newsletters, brochures, reports, pamphlets, newsletters and other publications.
- PageMaker 7.0 Basics: Workspace, Toolbox & Rulers
- PageMaker 7.0 Basics: Creating a New Document
- PageMaker 7.0 Basics: Saving Your Documents
- PageMaker Basics 7.0: Printing a PageMaker Document
- Working with Text in Adobe PageMaker
- PageMaker 7.0 Basics: Using the Pointer Tool
- PageMaker 7.0 Basics: How to Use the Control Palette
- Tutorial for Importing Text and Word Documents with the Place Command in PageMaker 7.0
Search
Categories
Latest Article
Setting Personal Goals: Be Grateful Every Day
Setting Personal Goals: Lay Out a Path to Your Future
Setting Personal Goals: Reconcile With the Past
Setting Personal Goals: Write Down What You Want
Career Development: Stage of Career
Tags
- Composting and proper waste disposal
- Computing enterprise security topics document security
- Computing enterprise security topics network
- Computing enterprise security topics physical security
- Computing enterprise security topics spam hackers
- Computing enterprise security topics viruses worms
- Computing hardware topics broadband
- Computing hardware topics computer gadgets
- Computing hardware topics computer peripherals
- Computing hardware topics computer storage
- Computing hardware topics CPU memory
- Computing hardware topics desktops
- Computing hardware topics displays
- Computing hardware topics hardware news
- Computing hardware topics hardware support
- Computing hardware topics keyboards mice
- Computing hardware topics laptops
- Computing hardware topics mobile computing
- Computing hardware topics news commentary
- Computing hardware topics power supply
- Computing hardware topics printers
- Computing hardware topics servers
- Computing hardware topics tablets
- Computing linux topics linux browsing
- Computing linux topics linux commands
- Computing linux topics linux desktops
- Computing linux topics linux distributions
- Computing linux topics linux introduction
- Computing linux topics linux multimedia
- Computing linux topics linux news
- Computing linux topics linux performance
- Computing linux topics linux productivity
- Computing linux topics linux security
- Computing linux topics linux server
- Computing linux topics linux support
- Computing linux topics news commentary
- Computing MAC platform topics accessories
- Computing MAC platform topics apple
- Computing MAC platform topics appletv
- Computing MAC platform topics ilife
- Computing MAC platform topics ipad
- Computing MAC platform topics ipod
- Computing MAC platform topics itunes
- Computing MAC platform topics iwork
- Computing MAC platform topics macosx
- Computing MAC platform topics macosxserver
- Computing MAC platform topics macreviews
- Computing MAC platform topics mactips
- Computing MAC platform topics news commentary
- Computing MAC platform topics softwarereviews
- Computing smb security topics access
- Computing smb security topics antimalware
- Computing smb security topics antispam
- Computing smb security topics antivirus
- Computing smb security topics compliance
- Computing smb security topics database security
- Computing smb security topics disaster recovery
- Computing smb security topics encryption
- Computing smb security topics firewalls
- Computing smb security topics network security
- Computing smb security topics news commentary
- Computing smb security topics patch management
- Computing smb security topics phishing
- Computing smb security topics product reviews
- Computing smb security topics securitynews
- Computing smb security topics securitypolicies
- Computing smb security topics securitytraining
- Computing smb security topics smb security
- Computing smb security topics swo
- Computing smb security topics testing
- Computing windows platform topics expression web
- Computing windows platform topics hardware support
- Computing windows platform topics internet explorer
- Computing windows platform topics linux browsing
- Computing windows platform topics microsoft access
- Computing windows platform topics microsoft certification
- Computing windows platform topics microsoft communications
- Computing windows platform topics microsoft excel
- Computing windows platform topics microsoft news
- Computing windows platform topics microsoft powerpoint
- Computing windows platform topics microsoft word
- Computing windows platform topics news commentary
- Computing windows platform topics vista support
- Computing windows platform topics windows 10
- Computing windows platform topics windows 7
- Computing windows platform topics windows 8
- Computing windows platform topics windows hosting
- Computing windows platform topics windows live
- Computing windows platform topics windows multimedia
- Computing windows platform topics windows performance
- Computing windows platform topics windows security
- Computing windows platform topics windows server
- Computing windows platform topics windows updates
- Computing windows platform topics xp support
- Desktop computers reviews
- Education college topics admissions
- Education college topics adult learning
- Education college topics campus life
- Education college topics career
- Education college topics paying
- Education college topics preparing
- Education college topics reviews
- Education college topics studying
- Education college topics supplies
- Education early childhood topics infant development
- Education early childhood topics preschool activities
- Education early childhood topics preschool crafts
- Education early childhood topics preschool lessons
- Education early childhood topics preschool parent
- Education early childhood topics preschool teacher
- Education early childhood topics preschool themes
- Education early childhood topics toddler games
- Education early childhood topics toddler lessons
- Education homeschooling topics curriculums
- Education homeschooling topics news commentary
- Education homeschooling topics special needs
- Education homework tips topics architectural engineering
- Education homework tips topics book reviews
- Education homework tips topics college prep
- Education homework tips topics for parents
- Education homework tips topics math help
- Education homework tips topics news commentary
- Education homework tips topics science
- Education homework tips topics study guides
- Education homework tips topics test preparation
- Education homework tips topics writing help
- Education k 12 topics art lessons
- Education k 12 topics careers education
- Education k 12 topics classmanagement
- Education k 12 topics elementary education
- Education k 12 topics english lesson
- Education k 12 topics examinations
- Education k 12 topics fun activities
- Education k 12 topics high school
- Education k 12 topics history lesson
- Education k 12 topics math lessons
- Education k 12 topics middle school
- Education k 12 topics non secular
- Education k 12 topics psychology
- Education k 12 topics reviews
- Education k 12 topics science lesson
- Education k 12 topics social studies
- Education k 12 topics teacher tips
- Education k 12 topics technology
- Education languages topics esl
- Education languages topics french learning
- Education languages topics italian learning
- Education languages topics language acquisition
- Education languages topics learning german
- Education languages topics learning japanese
- Education languages topics learning latin
- Education languages topics other cultures
- Education languages topics other languages
- Education languages topics sign language
- Education languages topics software reviews
- Education languages topics spanish learning
- Education languages topics teaching spanish
- Education languages topics translation
- Education online learning topics associates
- Education online learning topics bachelors
- Education online learning topics certification
- Education online learning topics college reviews
- Education online learning topics doctorate
- Education online learning topics masters
- Education online learning topics news commentary
- Education online learning topics online course
- Education online learning topics online instructor
- Education online learning topics tips
- Education postgraduate topics career development
- Education postgraduate topics choosing school
- Education postgraduate topics doctorate
- Education postgraduate topics masters degrees
- Education postgraduate topics mba
- Education postgraduate topics news commentary
- Education postgraduate topics preparing
- Education special topics adhd
- Education special topics autism
- Education special topics dyslexia
- Education special topics gifted learners
- Education special topics idea
- Education special topics iep
- Education special topics physical disabilities
- Education special topics study tips
- Education special topics teaching tips
- Electronics cameras camcorders topics accessories
- Electronics cameras camcorders topics camcorder reviews
- Electronics cameras camcorders topics camcorder tutorials
- Electronics cameras camcorders topics camera reviews
- Electronics cameras camcorders topics camera tutorials
- Electronics gizmos gadgets topics audio video
- Electronics gizmos gadgets topics computer
- Electronics gizmos gadgets topics concept
- Electronics gizmos gadgets topics ebook readers
- Electronics gizmos gadgets topics household
- Electronics gizmos gadgets topics kitchen
- Electronics gizmos gadgets topics news commentary
- Electronics gizmos gadgets topics spy gear
- Electronics gizmos gadgets topics toys games
- Electronics gps topics applications
- Electronics gps topics basics
- Electronics gps topics geocaching
- Electronics gps topics gps products
- Electronics gps topics media
- Electronics gps topics support
- Electronics home theater topics basics
- Electronics home theater topics entertainment centers
- Electronics home theater topics home media
- Electronics home theater topics home sound
- Electronics home theater topics home vision
- Electronics home theater topics htpc cablecard
- Electronics home theater topics media sharing
- Electronics mp3 topics accessories
- Electronics mp3 topics ipod
- Electronics mp3 topics other
- Electronics mp3 topics sandisk
- Electronics mp3 topics sony
- Electronics mp3 topics zune
- Environment green computing topics buying guides
- Environment green computing topics hardware
- Environment green computing topics incentives
- Environment green computing topics news
- Environment green computing topics reviews
- Environment green computing topics software
- Environment green computing topics tips
- Environment green computing topics virtualization
- Environment green living topics children
- Environment green living topics construction
- Environment green living topics gardening
- Environment green living topics greentravel
- Environment green living topics home
- Environment green living topics homemade crafts
- Environment green living topics news commentary
- Environment green living topics organic food
- Environment green living topics personal care
- Environment green living topics recycling
- Environment green living topics shopping
- Environment renewable energy topics alternative fuels
- Environment renewable energy topics geothermal
- Environment renewable energy topics hydroelectricity
- Environment renewable energy topics news commentary
- Environment renewable energy topics renewable energy
- Environment renewable energy topics solar
- Environment renewable energy topics wind
- Environment science environmental topics agriculture
- Environment science environmental topics animal behavior
- Environment science environmental topics biodiversity
- Environment science environmental topics careers
- Environment science environmental topics climatechange globalwarming
- Environment science environmental topics endangered species
- Environment science environmental topics energy industry
- Environment science environmental topics environmental education
- Environment science environmental topics environmental health
- Environment science environmental topics environmental policy
- Environment science environmental topics geology
- Environment science environmental topics oceans
- Environment science environmental topics pollution
- Environment science environmental topics species
- Environment science environmental topics sustainability
- Environment science environmental topics usandworldbiodiversity
- Hints and tricks
- Identification information
- Internet google topics android
- Internet google topics blogger
- Internet google topics calendar
- Internet google topics chromeos
- Internet google topics firefox addons
- Internet google topics friend connect
- Internet google topics gmail
- Internet google topics google adsense
- Internet google topics google adwords
- Internet google topics google analytics
- Internet google topics google apps
- Internet google topics google books
- Internet google topics google chrome
- Internet google topics google code
- Internet google topics google corporate
- Internet google topics google desktop
- Internet google topics google docs
- Internet google topics google earth
- Internet google topics google finance
- Internet google topics google gadgets
- Internet google topics google groups
- Internet google topics google knol
- Internet google topics google labs
- Internet google topics google maps
- Internet google topics google news
- Internet google topics google notebook
- Internet google topics google pages
- Internet google topics google reader
- Internet google topics google suggest
- Internet google topics google talk
- Internet google topics google video
- Internet google topics google voice
- Internet google topics google wave
- Internet google topics igoogle
- Internet google topics image search
- Internet google topics orkut
- Internet google topics picasa
- Internet google topics product search
- Internet google topics resources
- Internet google topics scholar
- Internet google topics sketchup
- Internet google topics trends
- Internet google topics web elements
- Internet google topics webmaster tools
- Internet google topics you tube
- Internet security privacy topics basics
- Internet security privacy topics hacking
- Internet security privacy topics news commentary
- Internet security privacy topics phishing scams
- Internet security privacy topics privacy
- Internet security privacy topics products
- Internet web development topics advanced tutorials
- Internet web development topics beginners tutorials
- Internet web development topics blog tips
- Internet web development topics browsers plugins
- Internet web development topics coding tutorials
- Internet web development topics css help
- Internet web development topics flash director
- Internet web development topics freelancers pros
- Internet web development topics HTML articles
- Internet web development topics intermediate tutorials
- Internet web development topics javascript help
- Internet web development topics news commentary
- Internet web development topics php help
- Internet web development topics product reviews
- Internet web development topics social media
- Internet web development topics web design
- Internet web development topics web hosting
- Laboratory testing
- Mobile blackberry platform topics accessory reviews
- Mobile blackberry platform topics android guides
- Mobile blackberry platform topics app reviews
- Mobile blackberry platform topics development
- Mobile blackberry platform topics device reviews
- Mobile blackberry platform topics google android
- Mobile blackberry platform topics guides
- Mobile blackberry platform topics news commentary
- Mobile emerging platforms topics commentary opinion
- Mobile emerging platforms topics news
- Mobile emerging platforms topics rumors
- Mobile google android topics android sdk
- Mobile google android topics app reviews
- Mobile google android topics guides
- Mobile google android topics news commentary
- Mobile google android topics reviews
- Mobile htc topics apps
- Mobile htc topics development
- Mobile htc topics guides
- Mobile htc topics reviews
- Mobile iphone topics apps
- Mobile iphone topics development
- Mobile iphone topics manual
- Mobile iphone topics news commentary
- Mobile iphone topics reviews
- Mobile lg topics apps
- Mobile lg topics guides
- Mobile lg topics reviews
- Mobile manufacturers topics apps
- Mobile manufacturers topics guides
- Mobile manufacturers topics reviews
- Mobile mobile accessories topics cases
- Mobile mobile accessories topics docks
- Mobile mobile accessories topics general
- Mobile mobile accessories topics headsets
- Mobile motorola topics apps
- Mobile motorola topics guides
- Mobile motorola topics reviews
- Mobile plans carriers topics carriers
- Mobile plans carriers topics contracts
- Mobile samsung topics apps
- Mobile samsung topics guides
- Mobile samsung topics reviews
- Mobile symbian platform topics app reviews
- Mobile symbian platform topics development
- Mobile symbian platform topics guides
- Mobile symbian platform topics reviews
- Mobile windows mobile platform topics app reviews
- Mobile windows mobile platform topics device reviews
- Mobile windows mobile platform topics guides
- Money home buying topics financing
- Money home buying topics house buying
- Money home buying topics house flipping
- Money home buying topics investment property
- Money home buying topics law
- Money home buying topics renting
- Money home buying topics selling
- Money investing topics bonds bills
- Money investing topics forexmarket
- Money investing topics global market
- Money investing topics mutual funds
- Money investing topics options commodities
- Money investing topics retirement
- Money investing topics stock market
- Money investing topics stocks
- Money personal finance topics banking
- Money personal finance topics budgeting
- Money personal finance topics cost living
- Money personal finance topics credit cards
- Money personal finance topics debt
- Money personal finance topics fundraisers
- Money personal finance topics holidays special occasions
- Money personal finance topics insurance
- Money personal finance topics jobs careers
- Money personal finance topics mortgages
- Money personal finance topics news commentary
- Money personal finance topics savings accounts
- Money personal finance topics shopping tips
- Money personal finance topics tax help
- Money personal finance topics weddings
- Multimedia audio topics editing software
- Multimedia audio topics home recording
- Multimedia audio topics mixing editing
- Multimedia audio topics news commentary
- Multimedia audio topics podcasting
- Multimedia audio topics production
- Multimedia audio topics professional equipment
- Multimedia audio topics recording
- Multimedia audio topics software tutorials
- Multimedia audio topics tips techniques
- Multimedia photography topics beginner photographer
- Multimedia photography topics diy projects
- Multimedia photography topics famous photographers
- Multimedia photography topics news technology
- Multimedia photography topics photography business
- Multimedia photography topics photography techniques
- Multimedia photography topics software reviews
- Multimedia photography topics software tutorials
- Multimedia photography topics tips tricks
- Multimedia publishing topics business cards
- Multimedia publishing topics dtp careers
- Multimedia publishing topics dtp projects
- Multimedia publishing topics dtp tips
- Multimedia publishing topics fonts
- Multimedia publishing topics indesign
- Multimedia publishing topics microsoft publisher
- Multimedia publishing topics microsoft word
- Multimedia publishing topics news commentary
- Multimedia publishing topics photoshop tutorials
- Multimedia publishing topics printing
- Multimedia publishing topics quark tutorials
- Multimedia publishing topics software reviews
- Multimedia publishing topics templates
- Multimedia video topics animation
- Multimedia video topics camera reviews
- Multimedia video topics film festivals
- Multimedia video topics film production
- Multimedia video topics filmmaking techniques
- Multimedia video topics news commentary
- Multimedia video topics screenwriting
- Multimedia video topics software reviews
- Multimedia video topics software tutorials
- Multimedia video topics video editing
- Multimedia video topics video equipment
- Netbook computers reviews
- Office career planning topics employment law
- Office career planning topics losing quitting
- Office career planning topics occupations
- Office career planning topics resumes interviews
- Office career planning topics work family
- Office career planning topics workplace success
- Office collaboration topics collaboration tools
- Office collaboration topics email tips
- Office collaboration topics internet connections
- Office collaboration topics networking
- Office collaboration topics openoffice impress
- Office collaboration topics openoffice writer
- Office entrepreneurs topics becoming an entrepreneur
- Office entrepreneurs topics business law
- Office entrepreneurs topics business management
- Office entrepreneurs topics business planning
- Office entrepreneurs topics buying selling
- Office entrepreneurs topics franchise
- Office entrepreneurs topics funding
- Office entrepreneurs topics human resources
- Office entrepreneurs topics news commentary
- Office entrepreneurs topics sales marketing
- Office entrepreneurs topics starting business
- Office entrepreneurs topics success stories
- Office entrepreneurs topics taxes fees
- Office finance topics business tips
- Office finance topics general
- Office finance topics news commentary
- Office home topics office setup
- Office home topics online tools
- Office home topics productivity tips
- Office home topics professional development
- Office home topics software
- Office home topics staying organized
- Office home topics taxes
- Office home topics telecommuting
- Office home topics time management
- Office human resources topics basics
- Office human resources topics change management
- Office human resources topics employee recognition
- Office human resources topics labor law
- Office human resources topics news commentary
- Office human resources topics recruiting hiring
- Office human resources topics team building
- Office human resources topics training performance
- Product ranges troubleshooting tips on the best worst desktops
- Product ranges troubleshooting tips on the best worst subnotebooks netbooks
- Quiz
- Recycling
- Review
- Science aviation topics aircraft
- Science aviation topics history
- Science aviation topics pilot training
- Science aviation topics safety
- Science genetics topics biochemistry
- Science genetics topics cloning
- Science genetics topics disease
- Science genetics topics engineering
- Science genetics topics genetic testing
- Science genetics topics genetics basics
- Science genetics topics genomic research
- Science genetics topics inherited traits
- Science genetics topics molecular biology
- Science genetics topics scientists
- Science medical topics anatomy
- Science medical topics anesthesia
- Science medical topics careers
- Science medical topics diagnostic tests
- Science medical topics first aid
- Science medical topics infections
- Science medical topics lab testing
- Science medical topics medications
- Science medical topics news commentary
- Science medical topics research experimentation
- Science medical topics stem cells
- Science space topics astronomy
- Science space topics cosmology
- Science space topics news commentary
- Science space topics solar system
- Science space topics space agencies
- Science space topics space technology
- Science space topics space travel
- Science space topics telescopes
- Shopping tips
- Workplace survival and success
- About |
- Copyright Policy |
- Privacy Policy |
- Terms of Use
BrightHub.com All Rights Reserved.


